|
Getting your Trinity Audio player ready... |
Table of Contents
| The easiest DIY hair oil for beginners uses 2 ingredients: coconut oil (base) + rosemary essential oil (for growth and scalp health). Mix 4 tablespoons of melted coconut oil with 8 drops of rosemary essential oil in a dark glass bottle. Apply to the scalp and lengths, leave for 30 minutes, then shampoo out. This is the most beginner-friendly, well-researched hair oil recipe that delivers visible results within 4-6 weeks of weekly use. |
Introduction: Why Make Your Own Hair Oil?
The hair oil aisle at any chemist or Amazon search results page is overwhelming. There are hundreds of options promising growth, shine, strength, and moisture, most of them at $30-60 a bottle, with ingredient lists you’d need a chemistry degree to decode.
Making your own hair oil costs a fraction of that. It takes 5 minutes. And because you control every ingredient, you can target exactly what your hair actually needs not what a marketing team decided was most profitable to bottle.
The best part about DIY hair oils for beginners is that they don’t require specialist knowledge, special equipment, or hard-to-find ingredients. You need a carrier oil, an optional active oil or essential oil, a dark glass bottle, and about 5 minutes.

That said, DIY hair oils are a complement, not a replacement, for evidence-based hair repair products when your hair has structural damage. If your hair is breaking, snapping, or losing elasticity that’s bond damage that requires a bond-rebuilding treatment. Our best bond builder for damaged hair guide covers the difference between cosmetic conditioning (what hair oils do) and structural repair (what bond builders like Olaplex do). Read that first if damage is your primary concern.
For everyone else dry hair, dull hair, slow-growing hair, itchy scalp, or just wanting a more natural hair care routine these 7 recipes are your starting point.
Before You Start: Beginner’s Guide to Hair Oil Ingredients
Carrier Oils vs. Essential Oils: What’s the Difference?
This is the most important distinction for any DIY hair oil beginner:
| Type | Examples | Concentration | How They Work | Safety |
|---|---|---|---|---|
| Carrier Oil | Coconut, jojoba, argan, castor, sweet almond | Used undiluted or as the base (80-100% of blend) | Moisturise, coat the hair shaft, reduce protein loss, add shine | Safe for direct skin and scalp contact |
| Essential Oil | Rosemary, lavender, peppermint, tea tree | Always diluted in carrier oil (2-3% max = 6-9 drops per 4 tbsp carrier) | Stimulate scalp circulation, antimicrobial, aromatic | Never apply undiluted to skin or scalp must be diluted |
| Active Plant Oils | Castor, bhringraj, neem, black seed | Can be used as a portion of the carrier base (10-30%) | Targeted benefits growth stimulation, scalp treatment | Generally safe; some (neem, black seed) have strong scents |
| Essential Oil Safety Rule for Beginners:Never exceed 2-3% essential oil concentration in any hair oil blend. For a 4-tablespoon (60ml) batch: maximum 12-18 drops of essential oil total. Less is more essential oils are potent and undiluted application can cause scalp irritation, burns, or sensitisation reactions. |
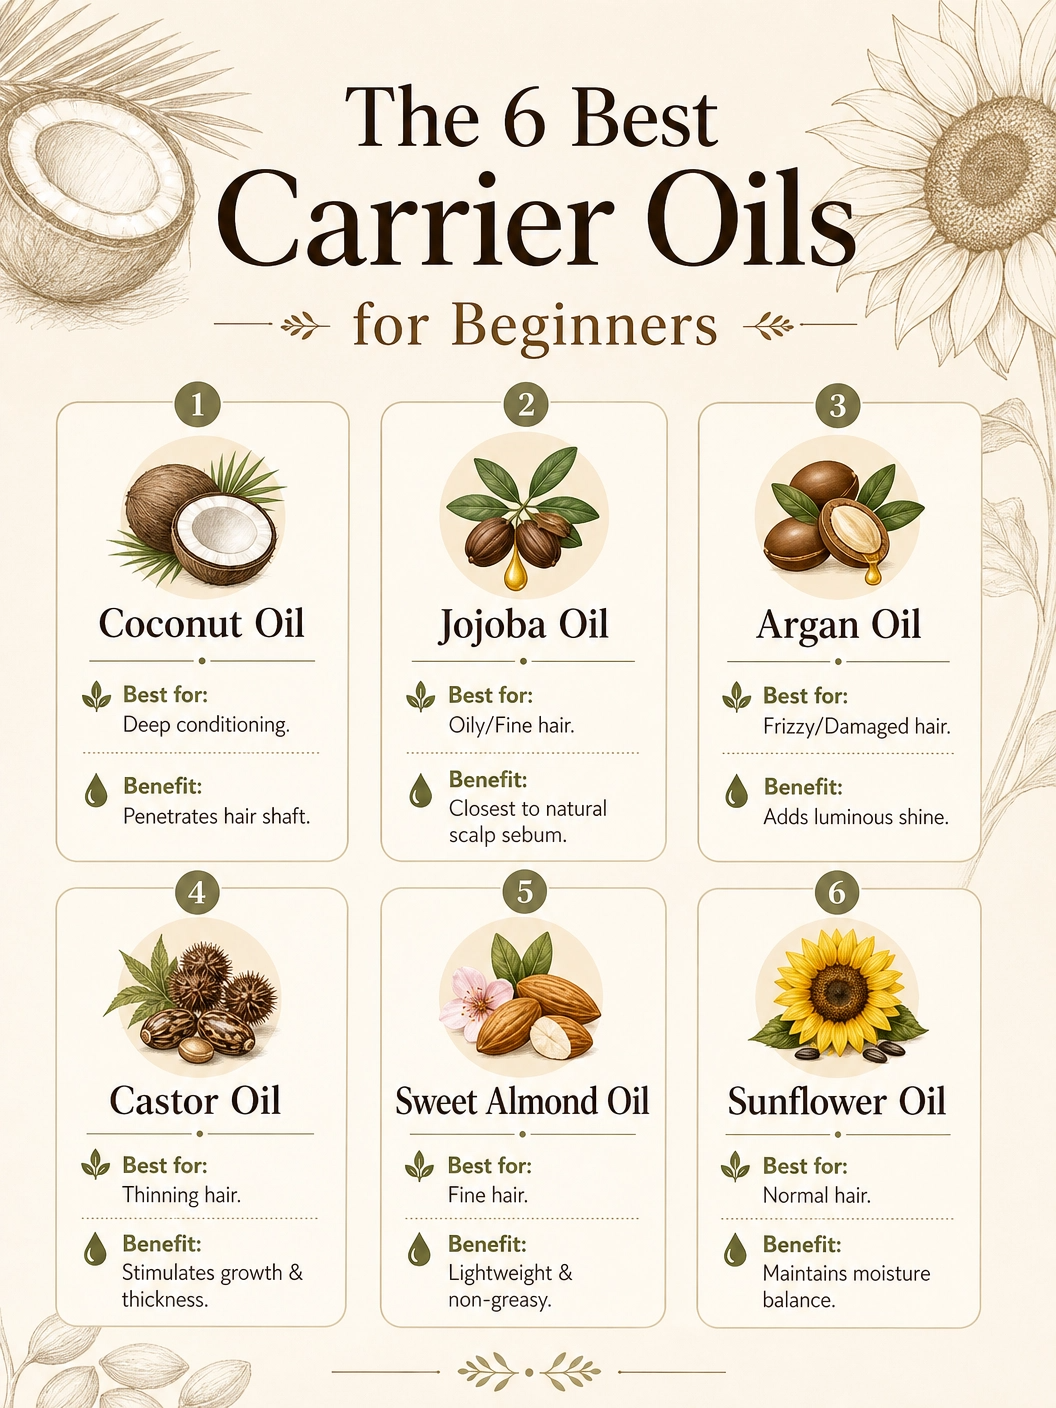
The 6 Best Carrier Oils for Beginners (All Available on Amazon AU)
| 1 | Coconut Oil (Refined or Virgin)Best For: All hair types except very fine hair Key Benefit: Penetrates the hair shaft to reduce protein loss not just a surface coating When to Use: Pre-shampoo treatment, hot oil treatment, overnight mask for very dry hair |
| 2 | Jojoba OilBest For: All hair types including fine, oily, and sensitive scalps Key Benefit: Chemically closest to the scalp’s natural sebum moisturises without heaviness or greasy residue When to Use: Daily scalp moisturiser, lightweight everyday oil, good base for all recipes |
| 3 | Argan OilBest For: Dry, frizzy, colour-treated, or heat-damaged hair Key Benefit: Rich in vitamin E and fatty acids smooths the cuticle, reduces frizz, adds luminous shine When to Use: Post-wash finishing oil, serum replacement, frizz control in humidity |
| 4 | Castor OilBest For: Thinning hair, slow growth, dry ends Key Benefit: Ricinoleic acid stimulates scalp circulation and creates a thick, conditioning film on hair fibres When to Use: Scalp massage oil (dilute with lighter oil), eyebrow/lash treatment, deep conditioning ends |
| 5 | Sweet Almond OilBest For: Fine to medium hair, sensitive scalps Key Benefit: Lightweight, vitamin-rich, non-comedogenic conditions without weight or buildup When to Use: Everyday lightweight oil, scalp-sensitive blends, good base for fine hair |
| 6 | Sunflower OilBest For: Normal, oily, or combination hair types Key Benefit: High in linoleic acid, strengthens the hair shaft, maintains scalp moisture balance When to Use: Budget-friendly base oil, blends well with heavier oils to lighten texture |
The 7 Easy DIY Hair Oil Recipes (Beginner-Friendly, Tested)
| Recipe #1The Classic Rosemary Growth Oil Best For: All hair types, especially those concerned with hair growth or thinning | Prep Time: 5 minutes | Shelf Life: 6 months (in dark glass bottle) Ingredients:4 tablespoons (60ml) jojoba oil base, 8 drops rosemary essential oil, 4 drops lavender essential oil (optional adds calming scent and scalp benefits), Dark glass dropper bottle (30-60ml) Method: Pour jojoba oil into your glass bottle using a small funnel. Add rosemary essential oil drops directly into the bottle. Add lavender drops if using. Cap the bottle and roll gently between palms for 30 seconds to blend. Label with date and ingredients. Apply 1-2ml to scalp sections, massage for 5 minutes, leave for a minimum of 30 minutes (or overnight with a shower cap), then shampoo out Pro Tip: Rosemary essential oil has strong clinical evidence for hair growth. A 2023 study found it performed comparably to minoxidil (Rogaine) for androgenetic alopecia at 6 months. Use consistently weekly for 12 weeks before evaluating results. For comparison with clinical-grade hair repair treatments, see our Olaplex No. 3 bond builder review. Rosemary oil addresses growth; Olaplex addresses structural damage. Different problems, different solutions. |
| Recipe #2The Deep Moisture Coconut Pre-Shampoo OilBest For: Dry, brittle, coarse, or chemically-treated hair craving deep hydration | Prep Time: 3 minutes | Shelf Life: 3 months Ingredients:3 tablespoons virgin coconut oil (melted place jar in warm water if solid)1 tablespoon argan oil5 drops lavender essential oil5 drops ylang ylang essential oil (optional promotes shine and scalp health) Method:Melt coconut oil by placing the jar in a bowl of warm water for 5 minutesCombine melted coconut oil and argan oil in a small bowlAdd essential oils and stir gentlyTransfer to a glass jar or bottleApply generously to dry hair from roots to ends, focusing on the lengths and tipsCover with a shower cap and leave for 45-60 minutes (or overnight for very dry hair)Shampoo out thoroughly you may need two rounds of shampoo to remove coconut oil fully Pro Tip: Coconut oil is the only commonly available oil that actually penetrates the hair cortex (rather than coating it), which is why pre-shampoo coconut oil treatments reduce protein loss during washing by up to 39% according to published hair science research. This is the most impactful thing you can do for dry, brittle hair at home. |
| Recipe #3The Lightweight Everyday Jojoba Blend Best For: Fine, thin, or easily-weighed-down hair that still needs moisture | Prep Time: 3 minutes | Shelf Life: 6-8 months Ingredients:3 tablespoons jojoba oil, 1 tablespoon sweet almond oil, 4 drops rosemary essential oil3 drops peppermint essential oil, 2 drops cedarwood essential oil Method: Combine jojoba and sweet almond oil in a 60ml dark glass bottleAdd essential oils in orderCap and roll gently to blendApply a small amount (3-4 drops) to the scalp only, not the lengths and massage for 3 minutesLeave for 20 minutes before shampooing, or use as a scalp serum on wash day Pro Tip: Fine hair owners often avoid hair oils entirely because of heaviness and grease, but a scalp-only application of jojoba leaves hair feeling clean and bouncy, not weighed down. The peppermint creates a cooling tingle that signals increased scalp circulation, and the aromatherapy experience alone makes this a daily ritual worth building. Fine hair benefits most from a simplified 2-step routine approach, less product, correct placement, and better results. The same principle applies here: scalp-only application for fine hair is the correct placement technique. |
| Recipe #4: The Castor + Rosemary Scalp StimulatorBest For: Thinning hair, slow growth, bald patches, or postpartum hair loss | Prep Time: 5 minutes | Shelf Life: 6 monthsIngredients:2 tablespoons castor oil (Jamaican Black Castor Oil preferred), 2 tablespoons jojoba oil (to thin the castor oil for easier application), 10 drops rosemary essential oil, 5 drops peppermint essential oil, 3 drops cedarwood essential oil Method: Combine castor oil and jojoba oil in a bottle, shake to blend (castor oil is thick and needs a carrier to apply easily). Add essential oilsCap and shake againUsing a dropper or your fingertip, apply directly to scalp sections where growth is a concernMassage firmly for 5-10 minutes to stimulate circulationLeave for minimum 1 hour or overnightShampoo out completely castor oil requires thorough washing. Pro Tip: Castor oil alone is notoriously difficult to wash out. The 50/50 blend with jojoba solves this while maintaining castor oil’s thick conditioning and circulation-stimulating benefits. Jamaican Black Castor Oil (JBCO), the roasted version has additional nutrient content from the roasting process and is the variety with the strongest evidence for growth support. |
| Recipe #5 The Ayurvedic Bhringraj Growth OilBest For: Hair growth, scalp health, premature greying, or anyone wanting to explore traditional Indian hair care | Prep Time: 10 minutes (including heating) | Shelf Life: 3 monthsIngredients:4 tablespoons coconut oil1 tablespoon bhringraj powder (available on Amazon AU — also called Eclipta Alba)Optional: 1 tablespoon amla powder for extra growth support5 drops rosemary essential oil (added after cooling)Method:Add coconut oil and bhringraj powder to a small saucepan over very low heatStir gently and heat for 5-7 minutes — do not boil. You want infusion, not fryingRemove from heat and allow to cool for 20 minutesStrain through a fine mesh strainer or cheesecloth into a glass jar — discard the powderOnce cooled to room temperature, add rosemary essential oil and stirStore in a dark glass jar. The oil may solidify in cool temperatures — warm before useApply to scalp and lengths, leave for 1-2 hours or overnight, shampoo outPro Tip: Bhringraj has been used in Ayurvedic medicine for over 2,000 years specifically for hair growth and scalp health — and modern research is beginning to validate what traditional practitioners have always known. A study in the Journal of Ethnopharmacology found bhringraj oil outperformed 2% minoxidil in one growth trial. This is your ‘serious growth’ recipe. |
| Recipe #6The Shine & Frizz Control Argan BlendBest For: Frizzy, dull, colour-treated, or heat-damaged hair needing smoothing and luminosity | Prep Time: 3 minutes | Shelf Life: 8 monthsIngredients:3 tablespoons argan oil1 tablespoon sweet almond oil5 drops geranium essential oil4 drops frankincense essential oil3 drops sandalwood essential oil (or cedarwood as a budget alternative)Method:Combine argan and sweet almond oil in a 60ml dark glass bottleAdd essential oilsCap and roll to blendApply 3-4 drops to damp hair post-wash, focusing on mid-lengths and ends — avoid the scalpAlternatively, use 1-2 drops as a finishing oil on dry hair to smooth frizz and add shinePro Tip: This blend works as both a leave-in treatment and a finishing serum. Argan oil’s high oleic and linoleic acid content fills gaps in the hair cuticle, creating the smooth, reflective surface that looks like shine. This is the DIY equivalent of a salon smoothing treatment — used weekly, it progressively improves frizz and dullness without the chemical straightening risk.For maximum shine and frizz control when styling, the Dyson Airwrap’s Coanda effect complements this oil treatment beautifully — the heat-smart technology prevents the oil from ‘frying’ on the hair shaft. See our Dyson Airwrap Bluetooth Smart Styler review for how it pairs with natural hair care routines. |
| Recipe #7The Scalp Soothing Tea Tree BlendBest For: Itchy, flaky, dandruff-prone, or oily scalp. Also excellent for post-swim or post-gym scalp refresh | Prep Time: 5 minutes | Shelf Life: 4 monthsIngredients:3 tablespoons jojoba oil1 tablespoon neem oil (anti-fungal, anti-bacterial has a strong earthy scent)8 drops tea tree essential oil5 drops peppermint essential oil4 drops lavender essential oil (partially masks the neem scent)Method:Combine jojoba and neem oil in a dark glass bottle shake well as neem oil can be thickerAdd tea tree, peppermint, and lavender essential oilsCap and shake to combineApply directly to scalp sections using a dropper, focusing on itchy or flaky areasMassage gently for 3-5 minutesLeave for 30-45 minutes maximum tea tree is active and prolonged contact can irritate sensitive scalpsShampoo out completely. Use a gentle scalp-focused shampooPro Tip: Tea tree oil has strong antifungal activity against Malassezia the yeast responsible for most dandruff cases. A 2002 clinical trial found 5% tea tree shampoo reduced dandruff severity by 41%. In this blend, tea tree is present at approximately 3% therapeutic for most scalp conditions, low enough to avoid irritation at standard use.For persistent scalp conditions (severe flaking, redness, hair loss with itching), a dermatologist consultation is recommended before relying on DIY treatments. For general hair health support alongside this scalp blend, our K18 hair mask review covers the peptide treatment that repairs damage from the inside the shaft complementary to this scalp-focused approach. |

All 7 Recipes at a Glance
| # | Recipe | Best Hair Concern | Key Active | Difficulty | Shelf Life |
|---|---|---|---|---|---|
| 1 | Classic Rosemary Growth Oil | Hair growth, thinning | Rosemary EO | Beginner | 6 months |
| 2 | Deep Moisture Coconut Pre-Shampoo | Dry, brittle, chemically treated | Coconut + argan | Beginner | 3 months |
| 3 | Lightweight Jojoba Everyday Blend | Fine, thin hair needing scalp care | Jojoba + peppermint | Beginner | 6-8 months |
| 4 | Castor + Rosemary Scalp Stimulator | Thinning, slow growth | JBCO + rosemary EO | Easy | 6 months |
| 5 | Ayurvedic Bhringraj Growth Oil | Serious growth support, greying | Bhringraj powder | Easy (with heat) | 3 months |
| 6 | Shine & Frizz Control Argan Blend | Frizzy, dull, colour-treated | Argan + geranium EO | Beginner | 8 months |
| 7 | Scalp Soothing Tea Tree Blend | Dandruff, itchy scalp | Tea tree + neem | Easy | 4 months |
Equipment You Need (All Available on Amazon AU)
DIY hair oil requires almost no specialist equipment most of what you need is already in your kitchen. Here’s the complete beginner’s kit:
| Item | Why You Need It | Budget Option | Premium Option |
|---|---|---|---|
| Dark glass bottles (30-60ml) | UV light degrades carrier and essential oils dark glass extends shelf life dramatically | Brown glass dropper bottles (pack of 10, ~$15 on Amazon) | Miron violet glass bottles |
| Digital kitchen scale | Essential oils must be measured accurately drops vary by bottle | Any kitchen scale with 0.1g precision (~$12) | OXO kitchen scale |
| Small funnel | Prevents spills when transferring oils | Stainless steel kitchen funnel set (~$8) | Silicone mini funnel |
| Labels + waterproof marker | Always label with recipe name + date made | Kraft labels + permanent marker | Printed waterproof labels |
| Fine mesh strainer | Only needed for infused oil recipes (Recipe #5) | Tea strainer or cheesecloth (~$5) | Stainless mesh strainer |
| Shower cap | Essential for overnight or long-treatment applications | Disposable shower cap pack (~$6) | Reusable silicon cap |
How to Use DIY Hair Oil: Application Guide for Beginners
Scalp Application (for growth and scalp health recipes)
- Part your hair into sections 4-6 sections for thorough coverage
- Apply 2-3 drops directly to each exposed scalp section using a dropper
- Massage firmly with fingertips (not nails) in circular motions for 3-5 minutes this is as important as the oil itself for stimulating circulation
- Cover with a shower cap if leaving on for more than 30 minutes
- Leave for 30 minutes minimum, overnight maximum
- Shampoo thoroughly heavy oils (castor, coconut) may need two shampoo rounds
Length and Ends Application (for moisture and frizz recipes)
- Apply to damp hair post-wash for maximum absorption dry hair is less porous
- Start with 3-4 drops warmed between your palms, then smooth over mid-lengths and ends
- Avoid the scalp with heavier oils if you have fine hair or an oily scalp
- Alternatively, use 1-2 drops on dry hair as a finishing serum for frizz control and shine
Hot Oil Treatment Method (maximum penetration)
- Place your oil blend bottle in a bowl of warm water for 3-5 minutes
- Test the temperature on your wrist before applying it should feel comfortably warm, not hot
- Apply to dry hair, massage through, cover with a hot towel (microwave a damp towel for 30 seconds) or shower cap
- Leave 30-60 minutes the heat opens the hair cuticle for deeper penetration
- Shampoo out while hair is still warm for easiest removal
| How Often to Use DIY Hair Oil:Dry, damaged, or very porous hair: 1-2x per week as a pre-shampoo treatmentNormal hair: 1x per week pre-shampoo, or 2-3 drops as a finishing oil after washingFine or oily hair: Scalp-only application 1x per week; avoid daily use to prevent buildupGrowth-focused treatment: 1x per week consistently for minimum 12 weeks hair growth cycles are long and results require patienceNever apply heavy oils (coconut, castor) to dry hair as a leave-in they will coat the hair shaft and cause buildup that weighs down and dulls hair over time. |

When DIY Hair Oil Isn’t Enough: Knowing the Limits
DIY hair oils are genuinely effective for moisturising dry hair, improving scalp health, supporting growth, and adding shine. But there’s one category of hair damage they cannot address: structural bond damage.
If your hair is experiencing any of these: snapping mid-strand, losing elasticity (stretch without bounce-back), fading colour dramatically fast, or the curl pattern has disappeared, you have broken disulphide or keratin bonds from bleach, heat, or chemical treatments. Oil treatments cannot rebuild broken bonds. That requires a bond-repair system like Olaplex or K18. Our detailed best bond builder for damaged hair guide explains the science and gives you the right product for each damage type.
The good news: you can use DIY hair oils alongside bond-repair treatments. Use your Olaplex or K18 treatment first (bond repair), then follow up with your DIY oil the following week (moisture and scalp health). They address different layers of hair health and complement each other perfectly.
People Also Ask
What is the easiest DIY hair oil recipe for beginners?
The easiest DIY hair oil for beginners is 4 tablespoons of jojoba oil mixed with 8 drops of rosemary essential oil in a dark glass dropper bottle. Jojoba doesn’t solidify (unlike coconut oil), is lightweight, suits all hair types, and doesn’t require heating. Rosemary essential oil is the most evidence-backed essential oil for scalp health and hair growth. Total prep time: 2 minutes.
What carrier oil is best for hair growth?
For hair growth, castor oil is the most potent carrier oil; its ricinoleic acid content stimulates scalp prostaglandin receptors linked to hair follicle growth phase. However, castor oil must always be diluted with a lighter carrier oil (50% castor, 50% jojoba is the standard ratio) because its thick consistency makes application and removal difficult on its own. Pair with rosemary essential oil for the strongest combined growth-stimulating blend.
How long do homemade hair oils last?
Homemade hair oils last 3-8 months depending on the carrier oils used. Jojoba oil lasts longest (up to 2 years, making DIY blends shelf-stable for 8+ months). Coconut oil lasts 12-18 months. Castor oil lasts about 12 months. Blends last as long as the shortest-lasting ingredient. Always store in dark glass bottles away from heat and light, and add vitamin E oil (a few drops) to extend any blend’s shelf life by 3-6 months.
Can I leave DIY hair oil in overnight?
Yes, overnight treatments are more effective for deep moisturising and scalp absorption than short-duration applications. The key requirements: wear a shower cap or old pillowcase to prevent oil transfer to bedding, use an oil that suits overnight use (jojoba, argan, and almond oil are ideal; castor and coconut oil are fine but harder to remove in the morning), and shampoo thoroughly the following morning. Do not leave tea tree oil blends overnight, as prolonged contact can irritate sensitive scalps.
What essential oils are best for hair growth?
The three essential oils with the strongest scientific evidence for hair growth are: (1) Rosemary oil multiple clinical studies support its effectiveness, with one finding comparable results to 2% minoxidil; (2) Peppermint oil increases dermal thickness and follicle depth in animal studies with emerging human evidence; (3) Cedarwood oil traditionally used for scalp circulation and featured in a small alopecia areata trial with promising results. All must be diluted to 2-3% in a carrier oil before scalp application.
Frequently Asked Questions
Do I need to heat the oil before applying?
Not for most recipes, but warming your oil improves penetration and the overall application experience. For a quick warm, hold the bottle under warm running water for 1 minute or roll it between your palms for 30 seconds. For a proper hot oil treatment, place the bottle in a bowl of warm (not boiling) water for 3-5 minutes. Never microwave essential oil blends, as it degrades the volatile compounds that make essential oils active.
Can I use DIY hair oil on coloured or bleached hair?
Yes, in fact, coloured and bleached hair benefits significantly from regular oil treatments because the chemical process removes natural lipids from the hair shaft. Argan oil is the best choice for colour-treated hair, it smooths the cuticle (which helps colour retention), adds shine without heaviness, and is compatible with all colour types. Avoid coconut oil directly after colouring as it can make colour fade slightly faster. For significant bleach damage, pair oil treatments with a bond-repair system. Our K18 hair mask review covers the best option for bleach-damaged hair.
My hair feels greasy after using hair oil what went wrong?
Three common causes: using too much oil (start with 3-4 drops for fine hair, not tablespoons), applying to dry hair as a leave-in when the hair isn’t porous enough to absorb it, or using the wrong oil for your hair type (coconut and castor oil are too heavy for fine hair as leave-ins use jojoba or argan instead). For pre-shampoo treatments, greasiness is expected before washing and shouldn’t persist after shampooing. If it does, add a second shampoo.
Are DIY hair oils safe during pregnancy?
Carrier oils (coconut, jojoba, argan, sweet almond, castor) are generally considered safe during pregnancy as scalp or hair applications. Essential oils require more caution some are contraindicated in pregnancy. Lavender and chamomile are generally considered safe in diluted topical use. Rosemary, peppermint, cedarwood, and tea tree essential oils are best avoided or used with medical advice during the first trimester. Always consult your healthcare provider before introducing new topical treatments during pregnancy.
How do I know if I’m having a reaction to a DIY hair oil?
Always perform a patch test 24 hours before full application: apply a small amount (5-10 drops) to the inside of your wrist or behind your ear and wait 24 hours. Signs of a reaction include persistent redness, itching, swelling, burning, or a rash. If any of these occur, wash off immediately and do not use the blend. Essential oils are the most common cause of reactions identify the likely culprit by testing ingredients individually. Carrier oils alone cause reactions only in cases of known nut or seed allergies (almond oil for tree nut allergies, for example).
| Ready to Build Your DIY Hair Oil Kit?All carrier oils, essential oils, and glass bottles for these recipes are available on Amazon Australia with Prime shipping.>>> Shop Handmade Beauty & Natural Care at ALsheikh <<<Which recipe will you try first? Share your results in the comments below! |
Best Amazon Beauty & Grooming Product Reviews